Saturday, March 31, 2012

Finishing touches with My2Angels

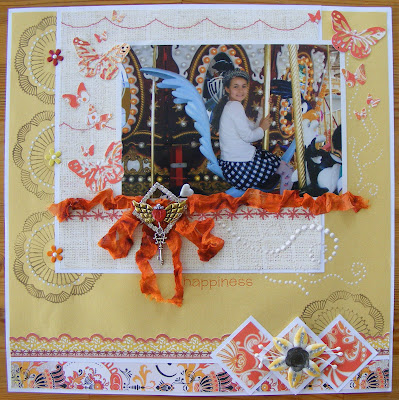
I made this layout for my parent's yearly album. It needed something else, but what? My2Angels is the perfect place for finishing touches.


First I took a rhinestone buckle and used a pin to hold it down, since the ribbon was already glued on. 


Then I started digging for some charms. I found the wingskey and the hatpin. The heart got a red coat with Perfect Pearls, but I knocked it over by accident and it landed on the paint side (of course!). I kind of liked the effect, so I left it. In your face, Murphy! 


I trimmed down the hatpin and attached the key...


...and glued it into the buckle. 


Check out this set of white mulberry flowers and butterflies. They are really good value because you can change their colour so easily. I simply inked the petal tips...


... and then put some rhinestones from a leftover piece of a rhinestone square on them.  


Add a cabochon flower and some stamen and you have the perfect mini cluster to balance the rhinestone buckle and charms. 


And here is the finished layout: 


Geli

Tuesday, March 20, 2012

Hobart ducks

And here is the class version of my last post! As you can see, with just a few small changes, different colours and photos it looks quite different.


If you are interested in coming next week, this is what we'll do. It's excellent for leftover papers. 

Monday, March 19, 2012

How to shabby emboss charms

I made this layout for My2Angels, the place to get charms. (If the sky wasn't so grey I could get a better photo of this, but for now this will have to do)
Charms look quite cute just the way they are, but sometimes it's nice to alter them a little.Here I want to show you how to shabby emboss your charms.
First, I heated a camera charm with a heat gun (use tweezers!) and sprinkled embossing powder over it. It looked like this:
Quite nice, but I wanted a different colour. So I heated it again and sprinkled pink embossing powder on top:
I liked that effect, but now I had overdone it a bit and all the detail of the charm had disappeared. So I scratched some of the embossing powder off again:
 
 And heated it once more to set. After it was cool, I used a watermark pen to add some copper embossing powder to the lens, so it would stand out a little. And there you have it, a shabby little charm:
It's fun to experiment a little.
The yellow rosette is made with this super useful rosette die.
Here are some closies:
For the background I inked a Crafter's Workshop template with Distress ink and printed with it, but it was a little hard to see. So I repeated it, but this time with Glimmer Mist and got this effect. Nice.
A cute little dolphin charm and some resin flowers, definitely one of my favourites: 
If you want to stitch and have no embroidery floss left, you can use a single strand of the mega-versatile baker's twine. Tracy thinks I use it as dental floss, I go through this stuff so quickly...


Tuesday, March 6, 2012

My little fish

My Hannah has always been my fish. No matter how cold the water, she'll be in it. 


Just a quick sweet little page for my sweet little fish.