Tuesday, July 31, 2012

Fun things to do with washi tape

Rainbow alert !!!
I have a little girl who changes her favourite colour daily and "rainbow" is often the colour of the day.


I have a smallish collection (tiny, compared to some I have seen...) of washi tape and this stuff is really fun. So, what can you do with washi tape? 


If you like to have a play with it, come along to class next week and try it out. You don't have to go for the rainbow look, pick whatever colours you like.We'll make some washi butterflies, hearts and swirls...


...and a few tabs:


See ya there!

Tuesday, July 24, 2012

Kids of the 70-ies: rolled paper rose class

Our class next week has lots of rolled paper roses and handmade flowers. They kind of remind me of the 70ies.


Recently my parents sent me a bunch of negatives from my childhood and I've been busy scanning and printing them. Yes, that's me (the little one) and my sisters in 74. Those were the days, when we had mushroom haircuts and skirts reached all the way down to the mid-bum region!


Look, rolled flowers galore! They're so easy to make, we'll make heaps.


 and a bell flower. 


If you would like to come along to class, see the top of my blog for timetables and details or leave a comment. I do read them all.

Sunday, July 22, 2012

Create an album with me pt 7 - How to make a waterfall album

Today I'd like to show you how to make a waterfall album, just like I did on the Tahune Airwalk page. Don't be scared off by the many steps, just follow each one and you'll see it's actually quite simple. 


When you pull on the tab, an album falls open, like a waterfall:


I will put some journalling on the parts without photos.
Here is the story behind these photos: 
Magnitogorsk in the Southern Ural mountains is probably the ugliest city I have ever visited. There is steel industry and pollution everywhere (google image it and you'll see). We did have a great time there, but no thanks to the sights. Russians are simply lovely people to meet, no matter where you are. 
Bigger is not always best, but in Russia you realise that no statue can ever be too big:
(photo courtesy to this site)
This one was so massive that we could barely reach halfway up its knee. Yes, those tiny dwarves on his shoe - that's us. We were told that this statue marks the border between Europe and Asia. 


Anyway, on to the layout!
You can find everything I used at my2angels.
First, I attached a full sheet of paper to a leftover piece of flower paper (remember, I used some of it on the Babushki page already). The easiest way to do this is to use the barcode strip to glue the 2 pieces together and then trim it down to a 12" piece. I ended up with 7" of flower paper and 5" of red paper.


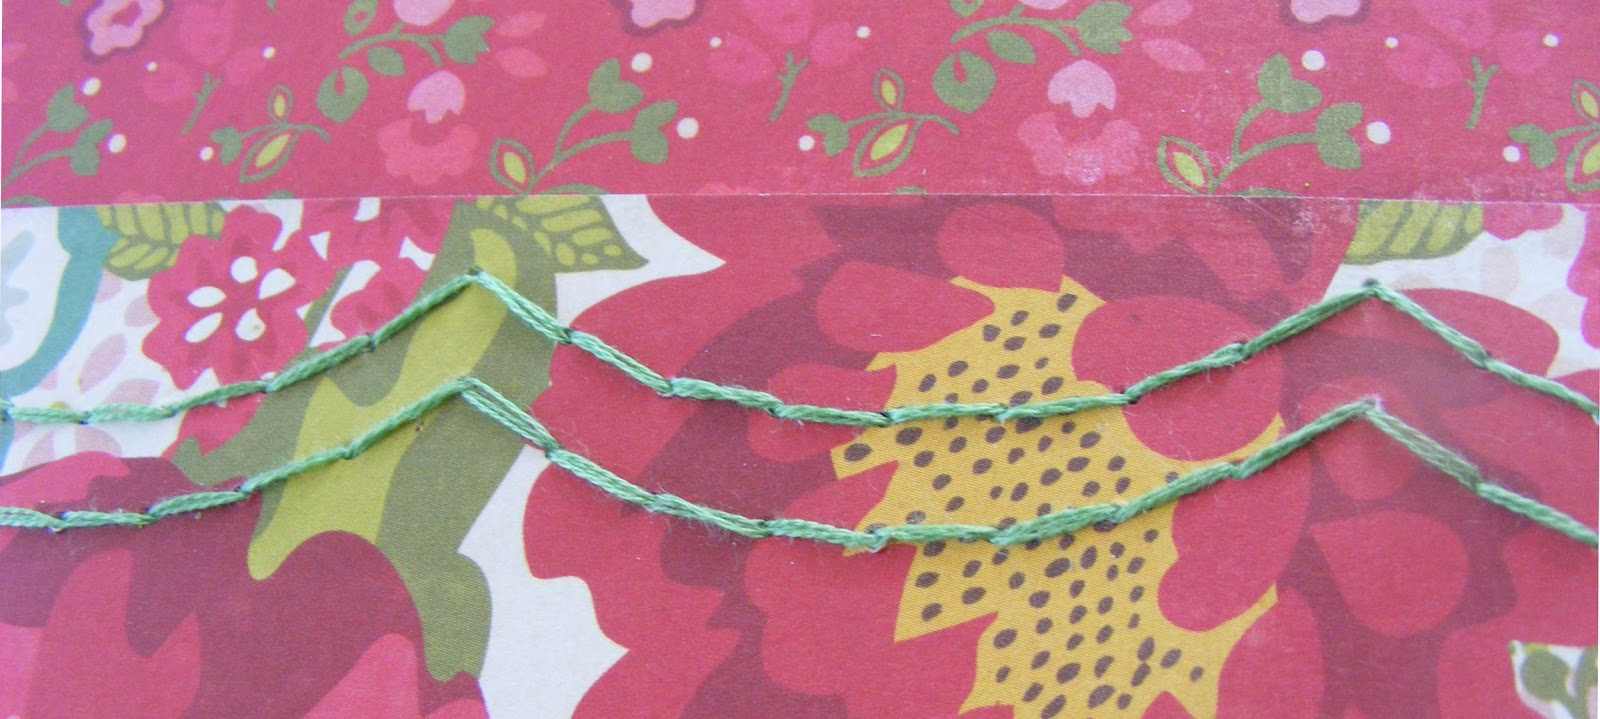
I used my Sew Easy tool to make the stitched scallops along the seam (a tutorial on this awesome tool coming soon!)


 There is one scallop coming from the left and 3 from the right. (Don't worry about the in-between part where they don't meet up, that will be hidden.) Add a photo and a frame, around 4x5" big.


Next I cut a sheet of cardstock into:
one 3x12" strip
six 3x4" pieces (they'll be the photo mats)
 and a 1x5" piece. 
This needs to be cut from proper scrapping cardstock, cause the cheap stuff is too flimsy.


Score the 3x12" piece at 7" from the right and then at every half inch till you have 6 scored lines:


Now fold those scored lines like this:


Put some sticky tape or glue on the 2 1/2 x 3" rectangle at the end and glue your first 3x4" photo mat on this. It'll overlap the end a bit, don't worry.


Next, put some sticky tape on the 1/2" area between the next 2 scored lines and attach the top of the 2nd photo mat on this:


Continue this way until all 6 mats are glued on. They should look like this from the side:


Now add some punched borders and the photos (mine are a tiny bit smaller than 3x4"). The album folds with the photos on top and the long cardstock strip (let's call it the "tail") on the bottom, like this:


Pretty up the last 1x5" strip of cardstock with a sticker border. Place the album on top of the frame and push the "tail" under the strip. Put some glue under the 2 sections marked with a cross and glue the strip down. Mine sits right on the seam between the 2 background papers. Re-enforce it with a brad on each side. Be careful not to put glue anywhere else, the album's "tail" needs to be able to move under it. 


Now put glue on top of the strip where it is marked with a cross in the middle, nowhere else:


Close the album halfway, place it so it sits right in the middle of the green frame and and push it down on the strip. The strip will end up being glued right under the bottom photo mat. 


Give that a moment to dry and make a tab while you wait. When you pull on it the album should work just fine now.


I thought my stitching should stand out a bit more, so I took some silver glitter ribbon, cut it in half and added some sticky tape to the back. Then I glued that in the space between the stitching lines. This ribbon is nice and soft and easy to bend into shape to follow the curves. Then I glued on some red rhinestone chain to hide the seam of my background papers.


And on top of each loop went a daisy charm. To make the red centre put a bit of Glossy Accents in the centre and cover it in microbeads. They are super cute as flower centres, but be careful, they are very jumpy! Let it all dry before sticking the charms down with a brad


All you need now is a title and you are ready to wow your friends with your awesomely clever waterfall album!
Geli

If you have missed the other 6 pages, here are the links:
part 5


Sunday, July 15, 2012

Explore

I finally got my boy layout done for my2angel's boy month:

 I had another play with Crafter's Workshop templates. They look really cool when you go over it with Rangers Distress inks and a blending tool
 Even the negative of a chipboard was converted into a mask. I used texture paste and because I was at a crop at Anne's house, it was a different brand of texture paste that turned see-through by the next day. I am intrigued... Will have to find out the brand.
I did the sewing with washi tape, cause I had forgotten to bring some ribbon. It's pretty cool, I think.

 This rosette die has got to be one of the most versatile tools in my stash. It's great for boys and girls and by trimming the cut-out strip skinnier you can make smaller rosettes. This one has a coin charm in the middle with a bit of Glossy Accents.

 Dangle a cowboy hat and a hammer with the help of a mobile phone cord and the explorer has everything he needs!

 Well, maybe throw in a balloon and a film strip, for good measure. These rhinestones are so much cheaper than the sticky ones and they stick a treat with Glossy Accents.

Cheers!

Create an album with me pt6 - Babushki

 Welcome to my 6th page of Heidi's album! As before, I am using the This & That collection and you can follow all the links to my2angels for all the products I used.


Believe it or not, I started with the sketch from the my2angels blog:

Okay, so it's a little hard to recognise on my layout, but that's the beauty of a sketch, you can change things to suit you. Give it a go, you can win an awesome prize! You have till the end of July.

Yes, you can make an entire album from the collection, plus a bit of cardstock. I used mostly white cardstock for all the background and it's nice to snazz them up a little. Spraying over a template with glimmer mist is a good way and you get all the negative bits coloured. BUT what if you want it the other way around? Here is how:
Spray the template with yellow daisy glimmer mist in an old pizza box (I covered parts of the mask with some spare paper cause I didn't want the whole size), then turn the template over and place it on the cardstock. 
 Careful, you don't get a second go! Press down a little and you get this:
 It gives an interesting, uneven look.
Next, cut out some flowers from one of the patterned papers and glue them along the left side. (For now, don't glue the bottom ones on)
 
 Glue 2 photos together and attach them with tape, but leave the top open. They'll become pockets for the journalling.
To reinforce them a bit, sew along those edges:
Make a thin border and 2 flags from some of the border strips of the patterned paper and glue them under the photos. Bit more sewing? Sure.
 
 I added a sweet little gift charm and a love charm (I cut off the loop with pliers)
Remember on page 2 I had 3 petals of the giant mulberry flower left over? It was already sprayed with yellow glimmer mist and sewn with baker's twine from my previous project. Yup, I can't throw anything away... Well, here it is, tugged under some more flowers.
And here are a few more embellies:
a cute little mushroom charm and some Liquid Pearls (a super saving alternative to stick on pearls) on a swirl from the sticker sheet:
...a mulberry butterfly, again sprayed with with 2 colours of glimmer mist, and a felt heart. You can sew it on or (if you already packed up the sewing machine, like me) staple it down and hide the staple with a pearl. Too easy. 
 Punch a hole in each of the large flowers and put a few stamens in each one. Oh look, another glimmer misted mulberry butterfly, this time green! And a star flower...
 Another thing I love is the baker's twine: just tie a bow and pop it on, perfect for a bit of dimension in small bites.
 Lastly, here are the journalling cards (I haven't written anything yet), they go in the pockets under the photos.
I'll be back next week with the next page. If you have missed the other pages, here are the links: 


Cheers, bloggerinos!


Tuesday, July 10, 2012

Airwalk - a waterfall album

The Tahune Airwalk in Tasmania was one of the highlights of our Tassie trip. My camera didn't do it justice, so what should I do with all these photos that are... well, so-so at best?
A waterfall album is always great for that kind of photos and we'll make this in class next week:


 It works like this. Pull here... 


 ...and the photos start popping up.


 You get the idea. It does look a little like a waterfall, great fun to play with.
 I used 6 half-sized photos, but you could squeeze 11 on. Surely you could round up that many?


By the way, we'll make this green leaf design too (in any colour you want)