Sunday, July 31, 2011

What if


This fortnight's challenge on the Boxx was:

*WHAT YOU WOULD DO WITH A FEW EXTRA HOURS IN A DAY.
*You may use as many photo's as you like.
*BUT Bonus points if you use at least 1 photo of your self on your lo.
*No other rules...just have fun!!


And...
I'm finally done! I think taking the photo was the thing that took the longest. LOL, oh so vain.
I have often thought that if I have to be cold in winter I'd like a bit of snow and ice to come with it. So, "What if I had more time (&$) to do the things I like?"
Out for publication


A little wintery swirl with German glitter glass


and a little blue flower:


and a pair of ice-skates. 


Well, I'm not complaining, but on cold winter nights in Queensland I miss my proper European winters!

Friday, July 29, 2011

Sweet Pea


My pretty little Leah as a baby. I imagined the torn paper made her look a little bit like a pea peeking out from its shell. 
We'll be doing this project in class next week (August 2-5). Hope to see you there!

How to make a charm pendant with My2Angels

Make a charm pendant (as seen on the My2Angels Blog)

My son loves turtles and here is a fun thing to make that will suit both boys and girls. First I cut the loop off a turtle charm with some pliers and filed the sharp edges a little. Then I covered a circle pendant with Dimensional Magic and put the charm into the middle. Make sure none of the Dimensional Magic gets on the charm.


Before it is dry cover it in glitter and let it dry completely (putting it in the sunshine speeds it up!). This will take at least half an hour, so be patient! Once it’s dry brush off any glitter from the charm and you’re done.


Have some fun with other charms like a snowflake snowflake for a Christmas card or a daisy for a girl’s necklace. You can even use the cabochon flowers cabochon flowers for a pretty look.


As a variation try a larger acrylic flower in a bottle cap (see the tutorial on how to squish them flat here)


Have fun with charms and follow the links to any of the products I used!


Friday, July 22, 2011

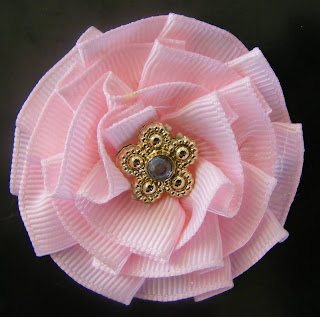
Making ribbon rosettes (with a version for seamstresses and one for the sewing impaired)

Here is a great way of making ribbon rosettes from a tutorial I did for my2angels. Everything I used can be bought there, too.

Take 1m of grosgrain ribbon, 12 - 20mm wide, and gather it in loops with your sewing machine. I simply fold the ribbon as I go. Sew only along the edge of the ribbon. The smaller the loops the better it will look.


Your ribbon is now only about 1/3 of the original length.


Cut a circle (about 4cm diameter) from sturdy cardstock. This does not have to be perfect as it won’t be seen. For the next step I have used a hot glue gun (cause I’m the impatient kind). You can also use Pritt Glue  and hold down each section for a little while till it sticks. Starting from the outer edge, glue on sections of the gathered ribbon until you’ve come all the way around. Then you start overlapping the previous row. Like a snail. You get it.

When you come to the middle leave a small empty space


Now you glue in a Cabochons Flower or an Acrylic Flowerdaisy charm or a flower from flower chain. Whatever takes your fancy.


This looks great on a hair pin or a head band too!

Are you a sewing impaired person? Don’t despair, here’s a cheater’s way (though it’s not as sturdy). Stick some 6mm double sided sticky tape  along one edge of the ribbon and peel it off one bit at the time as you stick it on the cardboard circle. Pinch it into loops as you go. I used about 1/2m of ribbon.


 Finish the centre however you like and you’re done in a flash. This is also great for ribbon that won’t sew easy, like the glitter ribbon I used.


If you have mastered the art of pinching and sewing you can do all sorts of cool stuff, even sewing in the middle of the ribbon and using it as a groovy border. Big loops will look good for boys, too.


Geli


Thursday, July 21, 2011

silly yoga in the park

I did this page for the July sketch challenge at the Boxx. Hannah was doing some silly yoga moves in the park and so I called it "silly yoga in the park".


 It was a little hard to photograph, but here is a close-up of the frame. It is made with a paper folding technique, which you can learn in class next week! 


And a little close-up of the balloon masking. The journaling says, "5 seconds of quick-fix inner peace" 

Tuesday, July 19, 2011

I'm on the WOW Design Team

Wooohooo, it's official and I can give my own trumpet a little toot: I got chosen for the DT at Wow, a chipboard company. Hold you breath for some awesome chippies coming this way.
Here are some other wonderful scrappers who are on the DT with me:


Sandrine Dawes, QLD
Tina Connolly, QLD
Sami Cronin, ACT
Liz Kordek, SA
Amanda Lawrence, QLD and
Kim Solomon, NSW
Gillian Lester, NSW
Sandra Staples, NSW (DT Co-Ordinator) and
Renae Woods, NSW.
and
Linda Baldock, NSW as the Product Designer


Check out the WOW blinkie on your right to have a look at their site.

Friday, July 15, 2011

New delicious Webster and felt ideas


Did you see the new Webster Let's Celebrate range at my2angels? I can't wait to get my hands on it, I think it looks wonderful and I've been told by Tracy that she didn't like it until she saw it in real life. Since I already love it on screen, it's gonna be awesome.

And if you have some felt slowly decaying in the back of your cupboard check out Tracy's blog for some super ideas what to do with it. Here's just 1 thing Tracy has posted:


Tuesday, July 5, 2011

Think about something that makes you smile


Recently I saw this cool technique in an old mag and we're going to have a play with masking, painting and stamping in class next week. The actual layout is quite simple so we can spend time on making the mosaic effect. 
This is how that paper looked when I started out:


and this is how it looks finished: 


Simple, but effective. The title was inspired by Renee's Scrapbook Savvy July challenge.

Geli

Friday, July 1, 2011

A new sparkle in her eye

My daughter Hannah got glasses last week. Well, I can only blame my bad genes for that... BUT doesn't she look smart! I used the June sketch challenge from Handmade by Suzanne. I really like using sketches when I'm a bit stuck for ideas and we'll be using this project in class this week.   


I used my new Martha Steward punch and Jac paper to make a sparkle lace border:


and some bake-in-the-oven play dough to make a rock star heart embelly:


and some very funky pink netting: